<?xml version="1.0" encoding="utf-8"?><feed xmlns="http://www.w3.org/2005/Atom" ><generator uri="https://jekyllrb.com/" version="4.4.1">Jekyll</generator><link href="https://lucasprag.com/feed.xml" rel="self" type="application/atom+xml" /><link href="https://lucasprag.com/" rel="alternate" type="text/html" /><updated>2026-05-31T17:24:28+00:00</updated><id>https://lucasprag.com/feed.xml</id><title type="html">Lucas Arantes</title><subtitle>Software engineer and VS Code extension developer. I build Don&apos;t Git Lost (git history navigation), Folder Projects (project switcher), and TeamDocs (team documentation). Blog about Ruby, developer productivity, and command line.</subtitle><entry><title type="html">🐚 Fish shell features in zsh</title><link href="https://lucasprag.com/posts/fish-shell-features-in-zsh/" rel="alternate" type="text/html" title="🐚 Fish shell features in zsh" /><published>2026-05-31T00:00:00+00:00</published><updated>2026-05-31T00:00:00+00:00</updated><id>https://lucasprag.com/posts/fish-shell-features-in-zsh</id><content type="html" xml:base="https://lucasprag.com/posts/fish-shell-features-in-zsh/"><![CDATA[<p>A while back I wrote about <a href="/2020-06-22-fish-the-shell">why I switched to fish shell</a>. But a lot of people don’t want to leave zsh — maybe they’ve been using it forever, have a big config they don’t want to rewrite, or just don’t want to deal with fish’s non-POSIX quirks. Fair enough!</p>

<p>The good news is that most of what I love about fish can be added to zsh with a few plugins. Here’s how.</p>

<h3 id="1-abbreviations">1. Abbreviations</h3>

<p>This is my favorite fish feature and the one I missed most when I had to use zsh. Fish expands abbreviations inline as you type — so <code class="language-plaintext highlighter-rouge">gs</code> becomes <code class="language-plaintext highlighter-rouge">git status</code> right in your prompt before you even hit enter.</p>

<p>Zsh doesn’t have this built in, but <a href="https://github.com/olets/zsh-abbr">zsh-abbr</a> does exactly the same thing:</p>

<div class="language-zsh highlighter-rouge"><div class="highlight"><pre class="highlight"><code><span class="c"># With Homebrew</span>
brew <span class="nb">install </span>olets/tap/zsh-abbr

<span class="c"># Then add to ~/.zshrc</span>
<span class="nb">source</span> <span class="si">$(</span>brew <span class="nt">--prefix</span><span class="si">)</span>/share/zsh-abbr/zsh-abbr.zsh
</code></pre></div></div>

<p>Then add your abbreviations:</p>

<div class="language-zsh highlighter-rouge"><div class="highlight"><pre class="highlight"><code>abbr <span class="nv">gs</span><span class="o">=</span><span class="s2">"git status"</span>
abbr <span class="nv">gd</span><span class="o">=</span><span class="s2">"git diff"</span>
abbr <span class="nv">ga</span><span class="o">=</span><span class="s2">"git add"</span>
abbr <span class="nv">gc</span><span class="o">=</span><span class="s2">"git commit"</span>
abbr <span class="nv">gp</span><span class="o">=</span><span class="s2">"git pull origin </span><span class="si">$(</span>current_branch<span class="si">)</span><span class="s2">"</span>
abbr <span class="nv">gP</span><span class="o">=</span><span class="s2">"git push origin </span><span class="si">$(</span>current_branch<span class="si">)</span><span class="s2">"</span>
</code></pre></div></div>

<p>Type <code class="language-plaintext highlighter-rouge">gs</code> and press Space and it expands to <code class="language-plaintext highlighter-rouge">git status</code>. Your history is readable, and when you’re pair programming your colleague can actually see what you’re doing.</p>

<p>If you already use Oh My Zsh, the built-in <code class="language-plaintext highlighter-rouge">globalias</code> plugin does something similar without any extra install.</p>

<h3 id="2-syntax-highlighting">2. Syntax highlighting</h3>

<p>Fish colors your commands as you type — unknown programs show up in red so you know right away if you made a typo. <a href="https://github.com/zsh-users/zsh-syntax-highlighting">zsh-syntax-highlighting</a> brings that to zsh.</p>

<div class="language-zsh highlighter-rouge"><div class="highlight"><pre class="highlight"><code><span class="c"># With Homebrew</span>
brew <span class="nb">install </span>zsh-syntax-highlighting

<span class="c"># Add to the END of ~/.zshrc (must be last or it won't work)</span>
<span class="nb">source</span> <span class="si">$(</span>brew <span class="nt">--prefix</span><span class="si">)</span>/share/zsh-syntax-highlighting/zsh-syntax-highlighting.zsh
</code></pre></div></div>

<p>One thing to watch out for: it has to be the last thing sourced in your <code class="language-plaintext highlighter-rouge">.zshrc</code>. If it’s not working, that’s probably why.</p>

<h3 id="3-oh-my-zsh">3. Oh My Zsh</h3>

<p><a href="https://ohmyz.sh/">Oh My Zsh</a> is basically Oh My Fish but for zsh. It’s a framework for managing plugins, themes, and functions, and it’s honestly even more popular.</p>

<div class="language-zsh highlighter-rouge"><div class="highlight"><pre class="highlight"><code>sh <span class="nt">-c</span> <span class="s2">"</span><span class="si">$(</span>curl <span class="nt">-fsSL</span> https://raw.githubusercontent.com/ohmyzsh/ohmyzsh/master/tools/install.sh<span class="si">)</span><span class="s2">"</span>
</code></pre></div></div>

<p>I have a <code class="language-plaintext highlighter-rouge">current_branch</code> function that returns the current git branch name, which I use in my abbreviations above. Here’s the zsh version:</p>

<div class="language-zsh highlighter-rouge"><div class="highlight"><pre class="highlight"><code><span class="c"># ~/.zshrc or ~/.oh-my-zsh/custom/functions.zsh</span>
<span class="k">function </span>current_branch<span class="o">()</span> <span class="o">{</span>
  <span class="nv">ref</span><span class="o">=</span><span class="si">$(</span>git symbolic-ref HEAD 2&gt;/dev/null<span class="si">)</span> <span class="o">||</span> <span class="se">\</span>
  <span class="nv">ref</span><span class="o">=</span><span class="si">$(</span>git rev-parse <span class="nt">--short</span> HEAD 2&gt;/dev/null<span class="si">)</span> <span class="o">||</span> <span class="k">return
  </span><span class="nb">echo</span> <span class="k">${</span><span class="nv">ref</span><span class="p">#refs/heads/</span><span class="k">}</span>
<span class="o">}</span>
</code></pre></div></div>

<p>And <code class="language-plaintext highlighter-rouge">kp</code> to kill processes interactively using <a href="https://github.com/junegunn/fzf">fzf</a>:</p>

<div class="language-zsh highlighter-rouge"><div class="highlight"><pre class="highlight"><code><span class="k">function </span>kp<span class="o">()</span> <span class="o">{</span>
  <span class="nb">local </span>pid
  <span class="nv">pid</span><span class="o">=</span><span class="si">$(</span>ps <span class="nt">-ef</span> | <span class="nb">sed </span>1d | fzf <span class="nt">-m</span> | <span class="nb">awk</span> <span class="s1">'{print $2}'</span><span class="si">)</span>
  <span class="o">[</span> <span class="nt">-n</span> <span class="s2">"</span><span class="nv">$pid</span><span class="s2">"</span> <span class="o">]</span> <span class="o">&amp;&amp;</span> <span class="nb">echo</span> <span class="nv">$pid</span> | xargs <span class="nb">kill</span> -<span class="k">${</span><span class="nv">1</span><span class="k">:-</span><span class="nv">9</span><span class="k">}</span>
<span class="o">}</span>
</code></pre></div></div>

<p>Oh My Zsh also has a bunch of <a href="https://github.com/ohmyzsh/ohmyzsh/wiki/Themes">themes</a> that show your git branch, whether you have uncommitted changes, and other things right in your prompt.</p>

<h3 id="4-autocomplete">4. Autocomplete</h3>

<p>Fish shows a gray suggestion as you type based on your history and you just hit the right arrow to accept it. <a href="https://github.com/zsh-users/zsh-autosuggestions">zsh-autosuggestions</a> does the same thing.</p>

<div class="language-zsh highlighter-rouge"><div class="highlight"><pre class="highlight"><code><span class="c"># With Homebrew</span>
brew <span class="nb">install </span>zsh-autosuggestions

<span class="c"># Add to ~/.zshrc</span>
<span class="nb">source</span> <span class="si">$(</span>brew <span class="nt">--prefix</span><span class="si">)</span>/share/zsh-autosuggestions/zsh-autosuggestions.zsh
</code></pre></div></div>

<p>One thing I actually prefer about zsh here: <code class="language-plaintext highlighter-rouge">ctrl+r</code> for history search works out of the box, no setup needed. In fish you have to wire it up manually.</p>

<p>If you want the fzf-powered version of <code class="language-plaintext highlighter-rouge">ctrl+r</code> anyway, add this after installing fzf:</p>

<div class="language-zsh highlighter-rouge"><div class="highlight"><pre class="highlight"><code><span class="nb">source</span> <span class="si">$(</span>brew <span class="nt">--prefix</span><span class="si">)</span>/opt/fzf/shell/key-bindings.zsh
</code></pre></div></div>

<h3 id="final-state-of-zshrc">Final state of ~/.zshrc</h3>

<p>All the <code class="language-plaintext highlighter-rouge">source</code> lines need to go in your <code class="language-plaintext highlighter-rouge">~/.zshrc</code>. Zsh reads that file automatically every time you open a new terminal, so once it’s in there you never have to think about it again.</p>

<p>Here’s what your <code class="language-plaintext highlighter-rouge">~/.zshrc</code> should look like with everything set up:</p>

<div class="language-zsh highlighter-rouge"><div class="highlight"><pre class="highlight"><code><span class="c"># Custom functions</span>
<span class="k">function </span>current_branch<span class="o">()</span> <span class="o">{</span>
  <span class="nv">ref</span><span class="o">=</span><span class="si">$(</span>git symbolic-ref HEAD 2&gt;/dev/null<span class="si">)</span> <span class="o">||</span> <span class="se">\</span>
  <span class="nv">ref</span><span class="o">=</span><span class="si">$(</span>git rev-parse <span class="nt">--short</span> HEAD 2&gt;/dev/null<span class="si">)</span> <span class="o">||</span> <span class="k">return
  </span><span class="nb">echo</span> <span class="k">${</span><span class="nv">ref</span><span class="p">#refs/heads/</span><span class="k">}</span>
<span class="o">}</span>

<span class="k">function </span>kp<span class="o">()</span> <span class="o">{</span>
  <span class="nb">local </span>pid
  <span class="nv">pid</span><span class="o">=</span><span class="si">$(</span>ps <span class="nt">-ef</span> | <span class="nb">sed </span>1d | fzf <span class="nt">-m</span> | <span class="nb">awk</span> <span class="s1">'{print $2}'</span><span class="si">)</span>
  <span class="o">[</span> <span class="nt">-n</span> <span class="s2">"</span><span class="nv">$pid</span><span class="s2">"</span> <span class="o">]</span> <span class="o">&amp;&amp;</span> <span class="nb">echo</span> <span class="nv">$pid</span> | xargs <span class="nb">kill</span> -<span class="k">${</span><span class="nv">1</span><span class="k">:-</span><span class="nv">9</span><span class="k">}</span>
<span class="o">}</span>

<span class="c"># Abbreviations</span>
<span class="nb">source</span> <span class="si">$(</span>brew <span class="nt">--prefix</span><span class="si">)</span>/share/zsh-abbr/zsh-abbr.zsh

abbr <span class="nv">gs</span><span class="o">=</span><span class="s2">"git status"</span>
abbr <span class="nv">gd</span><span class="o">=</span><span class="s2">"git diff"</span>
abbr <span class="nv">ga</span><span class="o">=</span><span class="s2">"git add"</span>
abbr <span class="nv">gc</span><span class="o">=</span><span class="s2">"git commit"</span>
abbr <span class="nv">gp</span><span class="o">=</span><span class="s2">"git pull origin </span><span class="si">$(</span>current_branch<span class="si">)</span><span class="s2">"</span>
abbr <span class="nv">gP</span><span class="o">=</span><span class="s2">"git push origin </span><span class="si">$(</span>current_branch<span class="si">)</span><span class="s2">"</span>

<span class="c"># Autosuggestions</span>
<span class="nb">source</span> <span class="si">$(</span>brew <span class="nt">--prefix</span><span class="si">)</span>/share/zsh-autosuggestions/zsh-autosuggestions.zsh

<span class="c"># fzf key bindings</span>
<span class="nb">source</span> <span class="si">$(</span>brew <span class="nt">--prefix</span><span class="si">)</span>/opt/fzf/shell/key-bindings.zsh

<span class="c"># Syntax highlighting — must be last</span>
<span class="nb">source</span> <span class="si">$(</span>brew <span class="nt">--prefix</span><span class="si">)</span>/share/zsh-syntax-highlighting/zsh-syntax-highlighting.zsh
</code></pre></div></div>

<p>After saving the file, run <code class="language-plaintext highlighter-rouge">source ~/.zshrc</code> once to apply everything to your current session. After that, new terminal windows will pick it all up automatically.</p>

<h3 id="why-stay-on-zsh-at-all">Why stay on zsh at all?</h3>

<p>Zsh is POSIX-compatible, which means bash scripts just work. You don’t have to remember to type <code class="language-plaintext highlighter-rouge">bash script.sh</code> when a colleague shares a script with you. That’s the main thing fish can’t offer.</p>

<p>With the plugins above though, you’re really not giving much up.</p>]]></content><author><name></name></author><category term="terminal" /><summary type="html"><![CDATA[Love what fish shell offers but want to stay in zsh? Here's how to get fish's best features — abbreviations, syntax highlighting, autosuggestions, and more — right in your existing zsh setup.]]></summary></entry><entry><title type="html">A lightweight alternative to GitLens for VS Code</title><link href="https://lucasprag.com/posts/dont-git-lost-vs-gitlens/" rel="alternate" type="text/html" title="A lightweight alternative to GitLens for VS Code" /><published>2026-05-30T00:00:00+00:00</published><updated>2026-05-30T00:00:00+00:00</updated><id>https://lucasprag.com/posts/dont-git-lost-vs-gitlens</id><content type="html" xml:base="https://lucasprag.com/posts/dont-git-lost-vs-gitlens/"><![CDATA[<p>GitLens is what everyone recommends when you ask how to see git blame in VS Code. It’s been around since 2017, it’s actively maintained, and it’s genuinely good. There’s a reason it has millions of installs.</p>

<p>This isn’t a post saying GitLens is bad. It’s not.</p>

<p>It’s a post about a different extension that’s going in a different direction — simpler, more focused — and that might fit your workflow better depending on what you’re actually after.</p>

<hr />

<h2 id="gitlens-does-a-lot">GitLens does a lot</h2>

<p>GitLens wants to be a full git client inside VS Code. Commit graph, worktrees, interactive rebase, AI explanations, multiple side panels, hundreds of settings. If you use all of that, it’s an incredible tool.</p>

<p>But if you only need blame and file history, you’re loading a lot of stuff you’re not using. It runs on startup, keeps background processes going, and has a real memory footprint. On a big repo or a slower machine, that adds up.</p>

<p>That’s not a criticism — it’s just a different set of trade-offs than what I was looking for.</p>

<hr />

<h2 id="what-dont-git-lost-does-instead">What Don’t Git Lost does instead</h2>

<p><a href="/extensions/dont-git-lost">Don’t Git Lost</a> is built around one question: <strong>what happened to this file, and why?</strong></p>

<p>Right now it focuses on three things, and each one is sharp:</p>

<p><strong>Inline blame</strong> — a quiet annotation at the end of whatever line your cursor’s on. Author, time, commit message. No setup needed.</p>

<p><img src="/assets/images/extensions/dont-git-lost/inline-blame.png" alt="Inline blame annotation showing author and commit message at the end of the current line" /></p>

<p><strong>Commit hover card</strong> — hover the annotation and you get the full picture: author photo, full commit message, exact date, a link to the commit, and — when it was part of a PR — a link straight to the PR.</p>

<p><img src="/assets/images/extensions/dont-git-lost/commit-hover-card.png" alt="Commit hover card showing author photo, commit message, date, SHA, and links to the commit and PR" /></p>

<p><strong>Time-travel navigation</strong> — toolbar buttons to step through every commit that touched the current file, with a gutter overlay or a diff editor showing exactly what changed.</p>

<p><img src="/assets/images/extensions/dont-git-lost/time-travel-overlay.png" alt="Time-travel overlay showing added and removed lines from a commit directly in the editor gutter" /></p>

<p><img src="/assets/images/extensions/dont-git-lost/time-travel-diff.png" alt="Time-travel side-by-side diff editor showing what changed in a commit" /></p>

<p>No commit graph, no background scanning, no paid tier. The extension is growing — but always toward useful and focused, not toward more panels and settings.</p>

<hr />

<h2 id="how-it-feels-to-use">How it feels to use</h2>

<p>Move your cursor to any line → blame shows up.</p>

<p>Hover it → commit card with the PR link right there.</p>

<p>Click the PR → full context in the browser: description, screenshots, the whole discussion around why that change was made.</p>

<p>Or just stay in the editor: hit <strong>←</strong> in the toolbar to walk back through the file’s history one commit at a time, with a gutter overlay showing what that commit changed. Same tab the whole time, no mess of open editors.</p>

<p>It takes seconds and you don’t lose your place.</p>

<hr />

<h2 id="its-much-lighter">It’s much lighter</h2>

<p>Don’t Git Lost is lazy on purpose. Blame runs on cursor movement. The toolbar only loads history when you click it. Nothing happens at startup. Nothing scans your repo in the background.</p>

<p>If you’ve felt GitLens adding weight to your VS Code, this is a noticeably different experience.</p>

<hr />

<h2 id="it-might-be-for-you-if">It might be for you if…</h2>

<ul>
  <li>You want inline blame without a full git client</li>
  <li>The question you keep asking is <em>“why does this line look like this?”</em></li>
  <li>You prefer tools that do one thing really well and keep getting better at it</li>
  <li>You want the PR link right there when you hover</li>
</ul>

<p><a href="https://marketplace.visualstudio.com/items?itemName=lucasprag.dont-git-lost">Install Don’t Git Lost</a> from the VS Code Marketplace or Open VSX. Free, works out of the box.</p>]]></content><author><name></name></author><category term="vscode" /><category term="git" /><category term="extension" /><summary type="html"><![CDATA[If you use GitLens mostly for inline blame and file history, Don't Git Lost does that workflow faster, lighter, and without the overhead.]]></summary></entry><entry><title type="html">Team docs always one click away in VS Code</title><link href="https://lucasprag.com/posts/team-docs-always-one-click-away-in-vscode/" rel="alternate" type="text/html" title="Team docs always one click away in VS Code" /><published>2026-05-30T00:00:00+00:00</published><updated>2026-05-30T00:00:00+00:00</updated><id>https://lucasprag.com/posts/team-docs-always-one-click-away-in-vscode</id><content type="html" xml:base="https://lucasprag.com/posts/team-docs-always-one-click-away-in-vscode/"><![CDATA[<p>At work my projects are organized something like this:</p>

<div class="language-plaintext highlighter-rouge"><div class="highlight"><pre class="highlight"><code>~/Work
├── back-end
├── front-end
└── docs
</code></pre></div></div>

<p>That <code class="language-plaintext highlighter-rouge">docs</code> folder has everything: architecture decisions, runbooks, onboarding guides, API contracts. The team keeps it in Markdown, versioned in git. It’s actually pretty good.</p>

<p>The problem is that I kept forgetting it was there, or I’d have to open a separate VS Code window just to read it. Sometimes I’d just open GitHub instead — and then I’m in a browser, which is never just one tab.</p>

<hr />

<h2 id="what-teamdocs-does">What TeamDocs does</h2>

<p><a href="/extensions/teamdocs">TeamDocs</a> adds a <strong>Team Docs</strong> icon to your VS Code Activity Bar. You point it at your docs folder:</p>

<div class="language-json highlighter-rouge"><div class="highlight"><pre class="highlight"><code><span class="nl">"teamdocs.path_to_docs_folder"</span><span class="p">:</span><span class="w"> </span><span class="s2">"~/Work/docs"</span><span class="w">
</span></code></pre></div></div>

<p>And that’s it. From that point on, your docs are always there in the sidebar — doesn’t matter which project you have open.</p>

<p><img src="/assets/images/extensions/teamdocs/docs-in-activity-bar.png" alt="TeamDocs folder tree in the VS Code Activity Bar" /></p>

<p>Click any Markdown file and it opens as a rendered preview, not raw source. Headings, code blocks, tables — all formatted.</p>

<p><img src="/assets/images/extensions/teamdocs/docs.png" alt="Rendered Markdown preview of a team doc inside VS Code" /></p>

<hr />

<h2 id="the-search-is-the-best-part">The search is the best part</h2>

<p>The Activity Bar view is nice for browsing, but the real time-saver is the search command.</p>

<p>Run <strong><code class="language-plaintext highlighter-rouge">Team Docs: Search</code></strong> and type a few characters to find any file instantly — same fuzzy picker as the rest of VS Code.</p>

<p><img src="/assets/images/extensions/teamdocs/search.png" alt="TeamDocs search command in the VS Code command palette" /></p>

<p><img src="/assets/images/extensions/teamdocs/search-result.png" alt="Search results showing matching team docs files" /></p>

<p>I use it mostly for two things:</p>
<ul>
  <li>Checking a past decision while writing code (“did we agree on UUIDs or integers for this?”)</li>
  <li>Finding a runbook mid-incident without opening a browser</li>
</ul>

<hr />

<h2 id="why-its-worth-it">Why it’s worth it</h2>

<p>Opening a browser tab to check something in the docs is never just opening a browser tab. You’re suddenly exposed to Slack, email, GitHub notifications. The doc check takes 30 seconds, the recovery takes longer.</p>

<p>Having the docs in the same window isn’t revolutionary. It just quietly removes one of the most common reasons to leave the editor.</p>

<hr />

<h2 id="setup">Setup</h2>

<ol>
  <li>Install <a href="https://marketplace.visualstudio.com/items?itemName=lucasprag.teamdocs">TeamDocs</a> from the VS Code Marketplace or Open VSX</li>
  <li>Set <code class="language-plaintext highlighter-rouge">teamdocs.path_to_docs_folder</code> to your docs folder</li>
  <li>Click the <strong>Team Docs</strong> icon in the Activity Bar</li>
</ol>

<p>Takes about a minute. Works across every project and workspace after that.</p>]]></content><author><name></name></author><category term="vscode" /><category term="documentation" /><category term="productivity" /><summary type="html"><![CDATA[How to access your team's Markdown documentation directly from the VS Code Activity Bar, without switching windows or opening a browser tab.]]></summary></entry><entry><title type="html">How I manage 30+ projects in VS Code with zero maintenance</title><link href="https://lucasprag.com/posts/manage-multiple-projects-in-vscode/" rel="alternate" type="text/html" title="How I manage 30+ projects in VS Code with zero maintenance" /><published>2025-05-29T00:00:00+00:00</published><updated>2025-05-29T00:00:00+00:00</updated><id>https://lucasprag.com/posts/manage-multiple-projects-in-vscode</id><content type="html" xml:base="https://lucasprag.com/posts/manage-multiple-projects-in-vscode/"><![CDATA[<p>I have a lot of projects. Side projects, open-source repos, work repos, internal tools. They accumulate.</p>

<p>At some point switching between them in VS Code became its own small friction point.</p>

<p>The usual options weren’t quite right:</p>

<ul>
  <li><strong>File → Open Recent</strong>: a long list of full paths that never reflects what I’m actually working on</li>
  <li><strong>VS Code Workspaces</strong>: overkill for just “open this folder”</li>
  <li><strong>Project Manager extension</strong>: requires registering each project when I clone it and removing stale entries when I’m done — I want zero maintenance</li>
</ul>

<p>The setup I’ve used for the past year takes two minutes to configure and has required zero upkeep since.</p>

<hr />

<h2 id="the-idea-your-directories-already-organize-your-projects">The idea: your directories already organize your projects</h2>

<p>Most developers already keep code in organized directories. I have <code class="language-plaintext highlighter-rouge">~/Projects</code> for personal work and <code class="language-plaintext highlighter-rouge">~/Work</code> for repos I work on at my day job. Every subdirectory of those folders is a project.</p>

<p>What I wanted: <em>treat every folder inside those roots as a project I can jump to.</em> The list stays current automatically.</p>

<p>That’s what <a href="/extensions/folder-projects">Folder Projects</a> does.</p>

<hr />

<h2 id="setup">Setup</h2>

<p>Install Folder Projects, then add your root directories to VS Code settings:</p>

<div class="language-json highlighter-rouge"><div class="highlight"><pre class="highlight"><code><span class="nl">"folderprojects.roots"</span><span class="p">:</span><span class="w"> </span><span class="p">[</span><span class="w">
  </span><span class="s2">"~/Projects"</span><span class="p">,</span><span class="w">
  </span><span class="s2">"~/Work"</span><span class="w">
</span><span class="p">]</span><span class="w">
</span></code></pre></div></div>

<p>That’s it. Run <strong><code class="language-plaintext highlighter-rouge">Folder Projects: List Projects to Open</code></strong> from the command palette and you get a fuzzy-searchable list of every subdirectory across both roots.</p>

<p><img src="/assets/images/extensions/folder-projects/list-of-projects.png" alt="Fuzzy-searchable list of projects in the VS Code command palette" /></p>

<p>I also ignore a few things I never want to see:</p>

<div class="language-json highlighter-rouge"><div class="highlight"><pre class="highlight"><code><span class="nl">"folderprojects.ignore"</span><span class="p">:</span><span class="w"> </span><span class="p">[</span><span class="w">
  </span><span class="s2">".*"</span><span class="p">,</span><span class="w">
  </span><span class="s2">"node_modules"</span><span class="p">,</span><span class="w">
  </span><span class="s2">"*/archived"</span><span class="w">
</span><span class="p">]</span><span class="w">
</span></code></pre></div></div>

<p>Hidden directories (<code class="language-plaintext highlighter-rouge">.git</code>, <code class="language-plaintext highlighter-rouge">.cache</code>) are excluded by default. The <code class="language-plaintext highlighter-rouge">*/archived</code> pattern catches a subfolder I use to park old repos without deleting them.</p>

<hr />

<h2 id="the-workflow">The workflow</h2>

<p><code class="language-plaintext highlighter-rouge">Cmd+Shift+P</code> is already wired to my muscle memory, so adding a <code class="language-plaintext highlighter-rouge">fp</code> prefix to fuzzy-search projects feels natural. I also bound the command to <code class="language-plaintext highlighter-rouge">Cmd+Shift+O</code> — one shortcut, type a few letters, open.</p>

<p>There’s also an Activity Bar view if you want to browse instead. Each root shows as a collapsible section with its projects listed underneath.</p>

<p><img src="/assets/images/extensions/folder-projects/activity-bar.png" alt="Folder Projects activity bar view showing roots as collapsible sections" /></p>

<hr />

<h2 id="why-not-project-manager">Why not Project Manager?</h2>

<p><a href="https://marketplace.visualstudio.com/items?itemName=alefragnani.project-manager">Project Manager</a> is great if you want to explicitly curate your list — tag projects, save specific folders, access remote paths.</p>

<p>The tradeoff is maintenance. Every new clone needs to be saved. Every abandoned project needs to be removed. I wasn’t consistent about it.</p>

<p>Folder Projects has no curation step. Clone a repo into <code class="language-plaintext highlighter-rouge">~/Projects</code> and it’s immediately available. Delete it and it’s gone. The list <em>is</em> the filesystem.</p>

<hr />

<h2 id="the-result">The result</h2>

<p>I’ve cloned dozens of repos since setting this up. None required any configuration to appear in the list. The ignored patterns have never needed updating.</p>

<p>The whole thing runs in the background and I never think about it — which is exactly what I want from tooling.</p>

<p>Install <a href="https://marketplace.visualstudio.com/items?itemName=lucasprag.folder-projects">Folder Projects</a> and spend two minutes on it. That’ll probably be the last time you think about it.</p>]]></content><author><name></name></author><category term="vscode" /><category term="productivity" /><summary type="html"><![CDATA[A simple VS Code setup for switching between dozens of projects instantly, without ever maintaining a project list.]]></summary></entry><entry><title type="html">How I navigate git history in VS Code without opening a terminal</title><link href="https://lucasprag.com/posts/navigate-git-history-in-vscode-without-a-terminal/" rel="alternate" type="text/html" title="How I navigate git history in VS Code without opening a terminal" /><published>2025-05-29T00:00:00+00:00</published><updated>2025-05-29T00:00:00+00:00</updated><id>https://lucasprag.com/posts/navigate-git-history-in-vscode-without-a-terminal</id><content type="html" xml:base="https://lucasprag.com/posts/navigate-git-history-in-vscode-without-a-terminal/"><![CDATA[<p>There’s a specific kind of frustration when you open a file and find code that doesn’t make immediate sense. Not badly written — just code that clearly had <em>a reason</em>, and that reason isn’t in the code itself.</p>

<p>The instinct is to reach for git:</p>

<div class="language-bash highlighter-rouge"><div class="highlight"><pre class="highlight"><code>git log <span class="nt">--follow</span> <span class="nt">-p</span> <span class="nt">--</span> app/models/user.rb
</code></pre></div></div>

<p>You get a wall of diffs. You scroll, squint at SHAs, try to mentally map the changes to the question you started with. By the time you find the commit, you’ve lost your context.</p>

<p>There’s a better way, and it stays inside the editor.</p>

<hr />

<h2 id="inline-blame-the-answer-at-a-glance">Inline blame: the answer at a glance</h2>

<p>The first thing I wanted was to know who wrote the line my cursor was on and roughly when. Not a full audit — just enough context to know whether this was ancient code or something that changed last week.</p>

<p>With <a href="/extensions/dont-git-lost">Don’t Git Lost</a>, every line your cursor rests on gets a quiet annotation at the end:</p>

<div class="language-plaintext highlighter-rouge"><div class="highlight"><pre class="highlight"><code>Jane Doe, 11 years ago • First working version of cleaned-up production logs.
</code></pre></div></div>

<p><img src="/assets/images/extensions/dont-git-lost/inline-blame.png" alt="Inline blame annotation showing author and commit message at the end of the current line" /></p>

<p>That one line usually answers the first question.</p>

<p>If the code is eleven years old, it predates half the codebase and probably made sense in a context you’d need to research. If it’s from last Tuesday, you know who to ask.</p>

<p>The annotation hides on uncommitted lines, debounces as you move (no flickering), and you can configure the format to show exactly what matters to you.</p>

<hr />

<h2 id="the-hover-card-the-full-story-without-leaving-the-editor">The hover card: the full story without leaving the editor</h2>

<p>When that one-liner isn’t enough, hover it.</p>

<p>A card appears showing:</p>

<ul>
  <li>The author’s photo (pulled from GitHub, GitLab, or Bitbucket)</li>
  <li>The complete commit message and exact date</li>
  <li>A short SHA with a copy button</li>
  <li>A link to open the commit in the browser</li>
  <li>A link to open the PR — when the commit was part of one</li>
</ul>

<p>The PR link is the one I use most. When a commit message says something vague like “fix edge case in billing,” the PR usually has a full description, screenshots, and the discussion that explains <em>why</em> this fix was chosen over the alternatives.</p>

<p><img src="/assets/images/extensions/dont-git-lost/commit-hover-card.png" alt="Commit hover card showing author photo, commit message, date, SHA, and links to the commit and PR" /></p>

<p>All of that in a hover. No terminal, no browser tab, no context switch.</p>

<hr />

<h2 id="time-travel-stepping-through-the-files-whole-history">Time-travel: stepping through the file’s whole history</h2>

<p>Sometimes a single commit isn’t enough. You want to walk the file backwards and see how it evolved — which commits touched it, what each one changed, and in what order.</p>

<p>Don’t Git Lost adds five buttons to the editor toolbar when you’re in a git-tracked file:</p>

<ul>
  <li><strong>←</strong> and <strong>→</strong>: step to the previous or next commit that touched this file, with a gutter overlay showing what that commit changed (added lines in green, removed lines in red)</li>
  <li><strong>◁</strong> and <strong>▷</strong>: same navigation, but opens in a proper side-by-side diff editor</li>
  <li><strong>⌂</strong>: return to the current working copy</li>
</ul>

<p><img src="/assets/images/extensions/dont-git-lost/time-travel-overlay.png" alt="Time-travel overlay showing added and removed lines from a commit directly in the editor gutter" /></p>

<p><img src="/assets/images/extensions/dont-git-lost/time-travel-diff.png" alt="Time-travel side-by-side diff editor showing what changed in a commit" /></p>

<p>Each step updates <strong>the same tab</strong> — no pile-up of diff editors. The status bar shows which commit you’re currently viewing so you always know your position in the history.</p>

<p>This is the feature I reach for when the blame annotation points to a commit that itself looks odd. I step back through the file’s history until I find the version where the pattern was first introduced, then check the commit message and PR for context.</p>

<hr />

<h2 id="a-real-example">A real example</h2>

<p>Last week I was looking at a data migration in a Rails app. There was a loop with an unusual guard clause — checking a condition that the data model should already prevent.</p>

<p>The blame annotation showed it was added two years ago. The commit message: “add guard for legacy records.” That told me something, but not enough.</p>

<p>I hovered the annotation and clicked the PR link. The description explained it all: when the migration first ran, there were records in production that violated the model constraint because a previous migration had been inconsistent. The guard was protecting against exactly that case.</p>

<p>Without the PR link, I’d have left a comment asking about it, or dug through git manually. With it, I had the answer in fifteen seconds — without leaving VS Code or losing my place in the code.</p>

<hr />

<h2 id="setup">Setup</h2>

<p>Install <a href="https://marketplace.visualstudio.com/items?itemName=lucasprag.dont-git-lost">Don’t Git Lost</a> from the VS Code Marketplace or Open VSX Registry. No configuration required — inline blame and the toolbar buttons are on by default.</p>

<p>For private repos, VS Code’s built-in GitHub account covers GitHub. For GitLab or Bitbucket, add a token in settings (takes about a minute).</p>

<p>If you’re in Cursor, the toolbar buttons may default to the <code class="language-plaintext highlighter-rouge">...</code> overflow menu — pin them once via “Configure Editor Title Menu Icons” and they stay visible permanently.</p>

<hr />

<p>The terminal isn’t going away, and <code class="language-plaintext highlighter-rouge">git log</code> has plenty of uses. But for the specific question of <em>“what happened to this line, and why?”</em>, staying in the editor is faster — and more importantly, it keeps your mental context intact.</p>]]></content><author><name></name></author><category term="vscode" /><category term="git" /><category term="productivity" /><summary type="html"><![CDATA[A walkthrough of how to understand why code is the way it is — using inline blame, commit hover cards, and time-travel navigation, all without leaving VS Code.]]></summary></entry><entry><title type="html">VS Code Extensions for Ruby and Rails Development</title><link href="https://lucasprag.com/posts/vscode-extensions-for-ruby-programming/" rel="alternate" type="text/html" title="VS Code Extensions for Ruby and Rails Development" /><published>2025-04-22T00:00:00+00:00</published><updated>2025-04-22T00:00:00+00:00</updated><id>https://lucasprag.com/posts/vscode-extensions-for-ruby-programming</id><content type="html" xml:base="https://lucasprag.com/posts/vscode-extensions-for-ruby-programming/"><![CDATA[<h2 id="fuzzy-ruby-server"><a href="https://marketplace.visualstudio.com/items?itemName=Blinknlights.fuzzy-ruby-server">Fuzzy Ruby Server</a></h2>

<p>Fuzzy Ruby Server provides <strong>go-to-definition</strong> and <strong>find references</strong> features. It works flawlessly on my personal projects and very well at work as well. Sometimes it doesn’t know which class definition to go to, but it shows a list with a preview that you can select. At work, we have over-complicated namespaces and repeated class names, so it makes sense it can’t figure it out by itself.</p>

<p>I heard good things about and would recommend <a href="https://marketplace.visualstudio.com/items?itemName=Shopify.ruby-lsp">Ruby LSP</a>, but I always have trouble making it work. At work, I use Docker, which is not supported unless you want to also run VSCode inside Docker. However, even on my own computer, I often see errors and can’t easily figure them out.</p>

<p>Fuzzy Ruby Server just works™️ with very good accuracy.</p>

<h2 id="change-case"><a href="https://marketplace.visualstudio.com/items?itemName=wmaurer.change-case">change-case</a></h2>

<p>Change-case provides many commands to change the case of the selected text between snake, camel, pascal, constant, kebab, and many others.</p>

<p>This extension is especially useful when working with Rails and React; however, I find myself using it frequently within Ruby code as well.</p>

<p><img src="https://lucasprag.com/assets/images/posts/vscode-ext-change-case.png" alt="change-case" /></p>

<h2 id="ruby-around-the-block"><a href="https://marketplace.visualstudio.com/items?itemName=elliotlarson.ruby-around-the-block">Ruby Around the Block</a></h2>

<p>This extension provides a Ruby Block Toggle command to toggle between <code class="language-plaintext highlighter-rouge">{ }</code> and <code class="language-plaintext highlighter-rouge">do end</code> syntaxes for Ruby blocks.</p>

<h2 id="vscode-run-rspec-file"><a href="https://marketplace.visualstudio.com/items?itemName=Thadeu.vscode-run-rspec-file">vscode-run-rspec-file</a></h2>

<p><img src="https://lucasprag.com/assets/images/posts/vscode-ext-run-rspec.png" alt="run rspec" /></p>

<h2 id="rails-rspec-file-toggler"><a href="https://marketplace.visualstudio.com/items?itemName=malt-03.rails-rspec-file-toggler&amp;ssr=false">rails-rspec-file-toggler</a></h2>

<p>This extension provides a command to toggle between spec and implementation, and it works really well.</p>

<h2 id="endwise"><a href="https://marketplace.visualstudio.com/items?itemName=kaiwood.endwise">endwise</a></h2>

<p>This extension adds the <code class="language-plaintext highlighter-rouge">end</code> in Ruby methods, classes, blocks, etc. Very small, yet coding without it is a hassle.</p>

<h2 id="standard-ruby-or-rubocop"><a href="https://marketplace.visualstudio.com/items?itemName=testdouble.vscode-standard-ruby">Standard Ruby</a> or <a href="https://marketplace.visualstudio.com/items?itemName=rubocop.vscode-rubocop">RuboCop</a></h2>

<p>Depending on what linter/formatter you use, they provide format-on-save, which is very helpful. I don’t care about spacing or which type of comma to use. I just code, save, and then I see my code all fall in line.</p>

<h2 id="erb"><a href="https://marketplace.visualstudio.com/items?itemName=CraigMaslowski.erb">erb</a></h2>

<p>Provides syntax highlighting for ERB templates.</p>

<h2 id="jbuilder-highlight"><a href="https://marketplace.visualstudio.com/items?itemName=MashDuek.jbuilder-highlight">jbuilder highlight</a></h2>

<p>Provides syntax highlighting for jbuilder templates.</p>

<h1 id="bonus-non-ruby-related-yet-very-useful-extensions">Bonus: Non-Ruby related, yet very useful extensions</h1>

<h2 id="tailwind-css-intellisense"><a href="https://marketplace.visualstudio.com/items?itemName=bradlc.vscode-tailwindcss">Tailwind CSS IntelliSense</a></h2>

<p>Auto-complete when writing Tailwind classes, even when using <code class="language-plaintext highlighter-rouge">@apply</code>.</p>

<p><img src="https://lucasprag.com/assets/images/posts/vscode-ext-tailwindcss.png" alt="tailwindcss" /></p>

<h2 id="thunder-client"><a href="https://marketplace.visualstudio.com/items?itemName=rangav.vscode-thunder-client">Thunder Client</a></h2>

<p>Feature-rich alternative to <a href="https://marketplace.visualstudio.com/items?itemName=Postman.postman-for-vscode">Postman</a>.</p>

<p><img src="https://lucasprag.com/assets/images/posts/vscode-ext-thunder-client.png" alt="thunder-client" /></p>

<h2 id="project-manager"><a href="https://marketplace.visualstudio.com/items?itemName=alefragnani.project-manager">Project Manager</a></h2>

<p>Save a folder or workspace as a Project in the extension and access them easily from a list.</p>

<p>If you keep your projects organized in root directories, <a href="/extensions/folder-projects">Folder Projects</a> is a lighter alternative — no manual registration, your directory structure is the project list.</p>

<h2 id="open-in-github"><a href="https://marketplace.visualstudio.com/items?itemName=sysoev.vscode-open-in-github">Open In GitHub</a></h2>

<p>Provides a command to quickly copy the GitHub link of the currently open file. Very helpful when you want to share the file or point to a line of code to send to someone on your team.</p>

<p>You can select a section in code, run the command, and send it. When the person opens it, it will be highlighted.</p>

<p><img src="https://lucasprag.com/assets/images/posts/vscode-ext-open-in-github.png" alt="open-it-github" /></p>

<h2 id="git-mob-co-author-commits"><a href="https://marketplace.visualstudio.com/items?itemName=RichardKotze.git-mob">Git Mob co-author commits</a></h2>

<p>Provides a list of co-authors to include in your commits. This is especially useful when pair programming.</p>

<p><img src="https://lucasprag.com/assets/images/posts/vscode-ext-co-author.png" alt="co-author" /></p>

<h2 id="code-spell-checker"><a href="https://marketplace.visualstudio.com/items/?itemName=streetsidesoftware.code-spell-checker">Code Spell Checker</a></h2>

<p>Gives you warnings of misspelled words in VSCode in whatever you are writing. Specially useful for blog posts!</p>

<h2 id="teamdocs"><a href="/extensions/teamdocs">TeamDocs</a></h2>

<p>Provides a way to check your team’s markdown documentation without having to leave your code.</p>

<p>At work, we have a repository with all our documentation, such as ADRs, decision docs, setup docs, and guides. With this extension, I can preview all the docs by using the Activity Bar or by using the <code class="language-plaintext highlighter-rouge">TeamDocs: search</code> command.</p>

<h3 id="in-the-activity-bar">In the Activity Bar</h3>

<p><img src="https://lucasprag.com/assets/images/posts/vscode-ext-teamdocs-in-activity-bar.png" alt="teamdocs-activity-bar" /></p>

<h3 id="the-search-command">The search command</h3>

<p><img src="https://lucasprag.com/assets/images/posts/vscode-ext-teamdocs-search.png" alt="teamdocs search command" /></p>

<h3 id="previewing-markdown-docs">Previewing markdown docs</h3>

<p><img src="https://lucasprag.com/assets/images/posts/vscode-ext-teamdocs-preview.png" alt="teamdocs preview" /></p>

<p>Have fun 💻 👋🏼</p>]]></content><author><name></name></author><category term="ruby" /><category term="rails" /><category term="vscode" /><summary type="html"><![CDATA[A curated list of VS Code extensions for Ruby and Rails developers — go-to-definition, case conversion, block toggling, RSpec runner, spec toggler, auto-end, linting, ERB support, and more.]]></summary></entry><entry><title type="html">How to answer ‘Tell me about yourself’ in a tech interview</title><link href="https://lucasprag.com/posts/tech-interview-tips/" rel="alternate" type="text/html" title="How to answer ‘Tell me about yourself’ in a tech interview" /><published>2025-03-27T00:00:00+00:00</published><updated>2025-04-02T00:00:00+00:00</updated><id>https://lucasprag.com/posts/tech-interview-tips</id><content type="html" xml:base="https://lucasprag.com/posts/tech-interview-tips/"><![CDATA[<p>I have participated in several hiring processes at my current company and others before that as well. I mostly focused on hiring senior software engineers on all of them. This post provides some guidance on how to answer the question: <strong>Could you tell me about yourself?</strong></p>

<p>This is a very common first question. Usually, it is the first step to get to know more about you.</p>

<p>This question can be asked in many different ways, such as “Could you give us an overview of your career?” or “Could you explain your past experiences?”, but what interviewers are really asking is “Why do you think <strong>you</strong> are a fit for this job position?”</p>

<p>It’s your job to answer that by using your Elevator Pitch ™️.</p>

<blockquote>
  <p>ℹ Info<br />
An elevator pitch quickly summarizes your experiences and skills in a short period of time, like the time it takes to go up in an elevator. It can either elevate the tone or level of the interview or diminish it.</p>
</blockquote>

<p>A good elevator pitch will:</p>

<h3 id="1-connect-your-skills-to-the-job-position-or-company-stack">1. Connect your skills to the job position or company stack</h3>

<p>If the job description is asking for a Ruby engineer and you have experience with Ruby, avoid talking too much about Java.</p>

<p>If you have more experiences in Java than in Ruby, try to highlight the skills that are <strong>interchangeable</strong>.</p>

<h3 id="2-only-talk-about-your-last-couple-of-most-impactful-experiences">2. Only talk about your last couple of most impactful experiences</h3>

<p>Avoid going through all your experiences. Bring to the front the ones where you had a great impact, such as leading the research, planning, and/or implementation of a large feature, refactor, or optimization.</p>

<p>Some folks make the mistake of going through all their experiences starting from their first few jobs usually as interns.</p>

<p>Others only talk about their current job, even if they didn’t have many opportunities to do impactful work.</p>

<p>Talk about the most impactful and relevant experiences, connecting them to the job position. They are usually the most recent few ones.</p>

<h3 id="3-talk-about-things-that-you-can-talk-in-depth">3. Talk about things that you can talk in depth</h3>

<p>The elevator pitch is useful for bringing subjects to the table that we can discuss in pursuit of identifying if the candidate is a good fit.</p>

<p>Some folks overly use “big words” such as system design, architecture or performance optimization, but when asked about it, they can’t go deep.</p>

<p>If a senior engineer talks about doing great optimization in a project, but when asked more about it, they can only talk about making sure the app is hitting indexes or avoiding N+1 queries, that’s disappointing.</p>

<h2 id="example-of-an-elevator-pitch">Example of an elevator pitch</h2>

<p>Job example: Senior full stack meant to work with Ruby on Rails, Postgres, React and TypeScript on an app that serves 3M daily users. Requirements include writing code, leading projects and mentoring other less senior engineers.</p>

<blockquote>
  <p>H. I’m Lucas. I’ve been working with Ruby on Rails for the last 10 years, mostly working with React. A couple of years ago, I picked up TypeScript which has been a fun ride.</p>

  <p>I’m a tech lead in my current job and my responsibilities include defining an implementation plan for features that we want to build setting the technical direction for our Ruby on Rails back-end, sometimes creating tasks, writing back-end code in Ruby and front-end in React &amp;TypeScript, increasing observability of our services making sure our metrics are visible and actionable, having 1:1s with my peers and participating in the upstream process to help validating how feasible features are and estimate their effort.</p>

  <p>I’m often drawn into complex problems which I love to solve. A cool project I worked recently was to optimize a task/script that would take several months to finish reducing it to be able to finish in 13 days.</p>

  <p>I currently work on a Loyalty platform for ecommerce and another cool project I worked recently was a React app to be placed during checkout that would allow customers to use exchange their Points for discounts🍀. That proved to be quite successful being responsible for XX% of all Point exchanges.</p>

  <p>That’s me in a nutshell.</p>
</blockquote>

<p>Take-aways:</p>
<ul>
  <li>I only talked about my most recent role.</li>
  <li>I mentioned an impactful back-end project and an impactful front-end project leaving room for follow-up questions.</li>
  <li>I gave some metrics to show how impactful the projects were.</li>
  <li>If asked, I could talk about either project for hours because I was deeply involved in them.</li>
  <li>If asked, I could talk in depth about each of the responsibilities I mentioned. I didn’t include all my responsibilities, only the ones I could connect to the job position and that I had great experiences to share related to them.</li>
</ul>

<h2 id="conclusion">Conclusion</h2>

<p>When you hear “tell me about yourself,” what the interviewer is really asking is whether you’re a good fit for the role. Your elevator pitch is how you answer that — concisely, confidently, and with the right details front and center.</p>

<p>Write it down, practice it, and try to use your natural language so it doesn’t sound rehearsed. A good answer to this question sets the tone for the whole interview.</p>

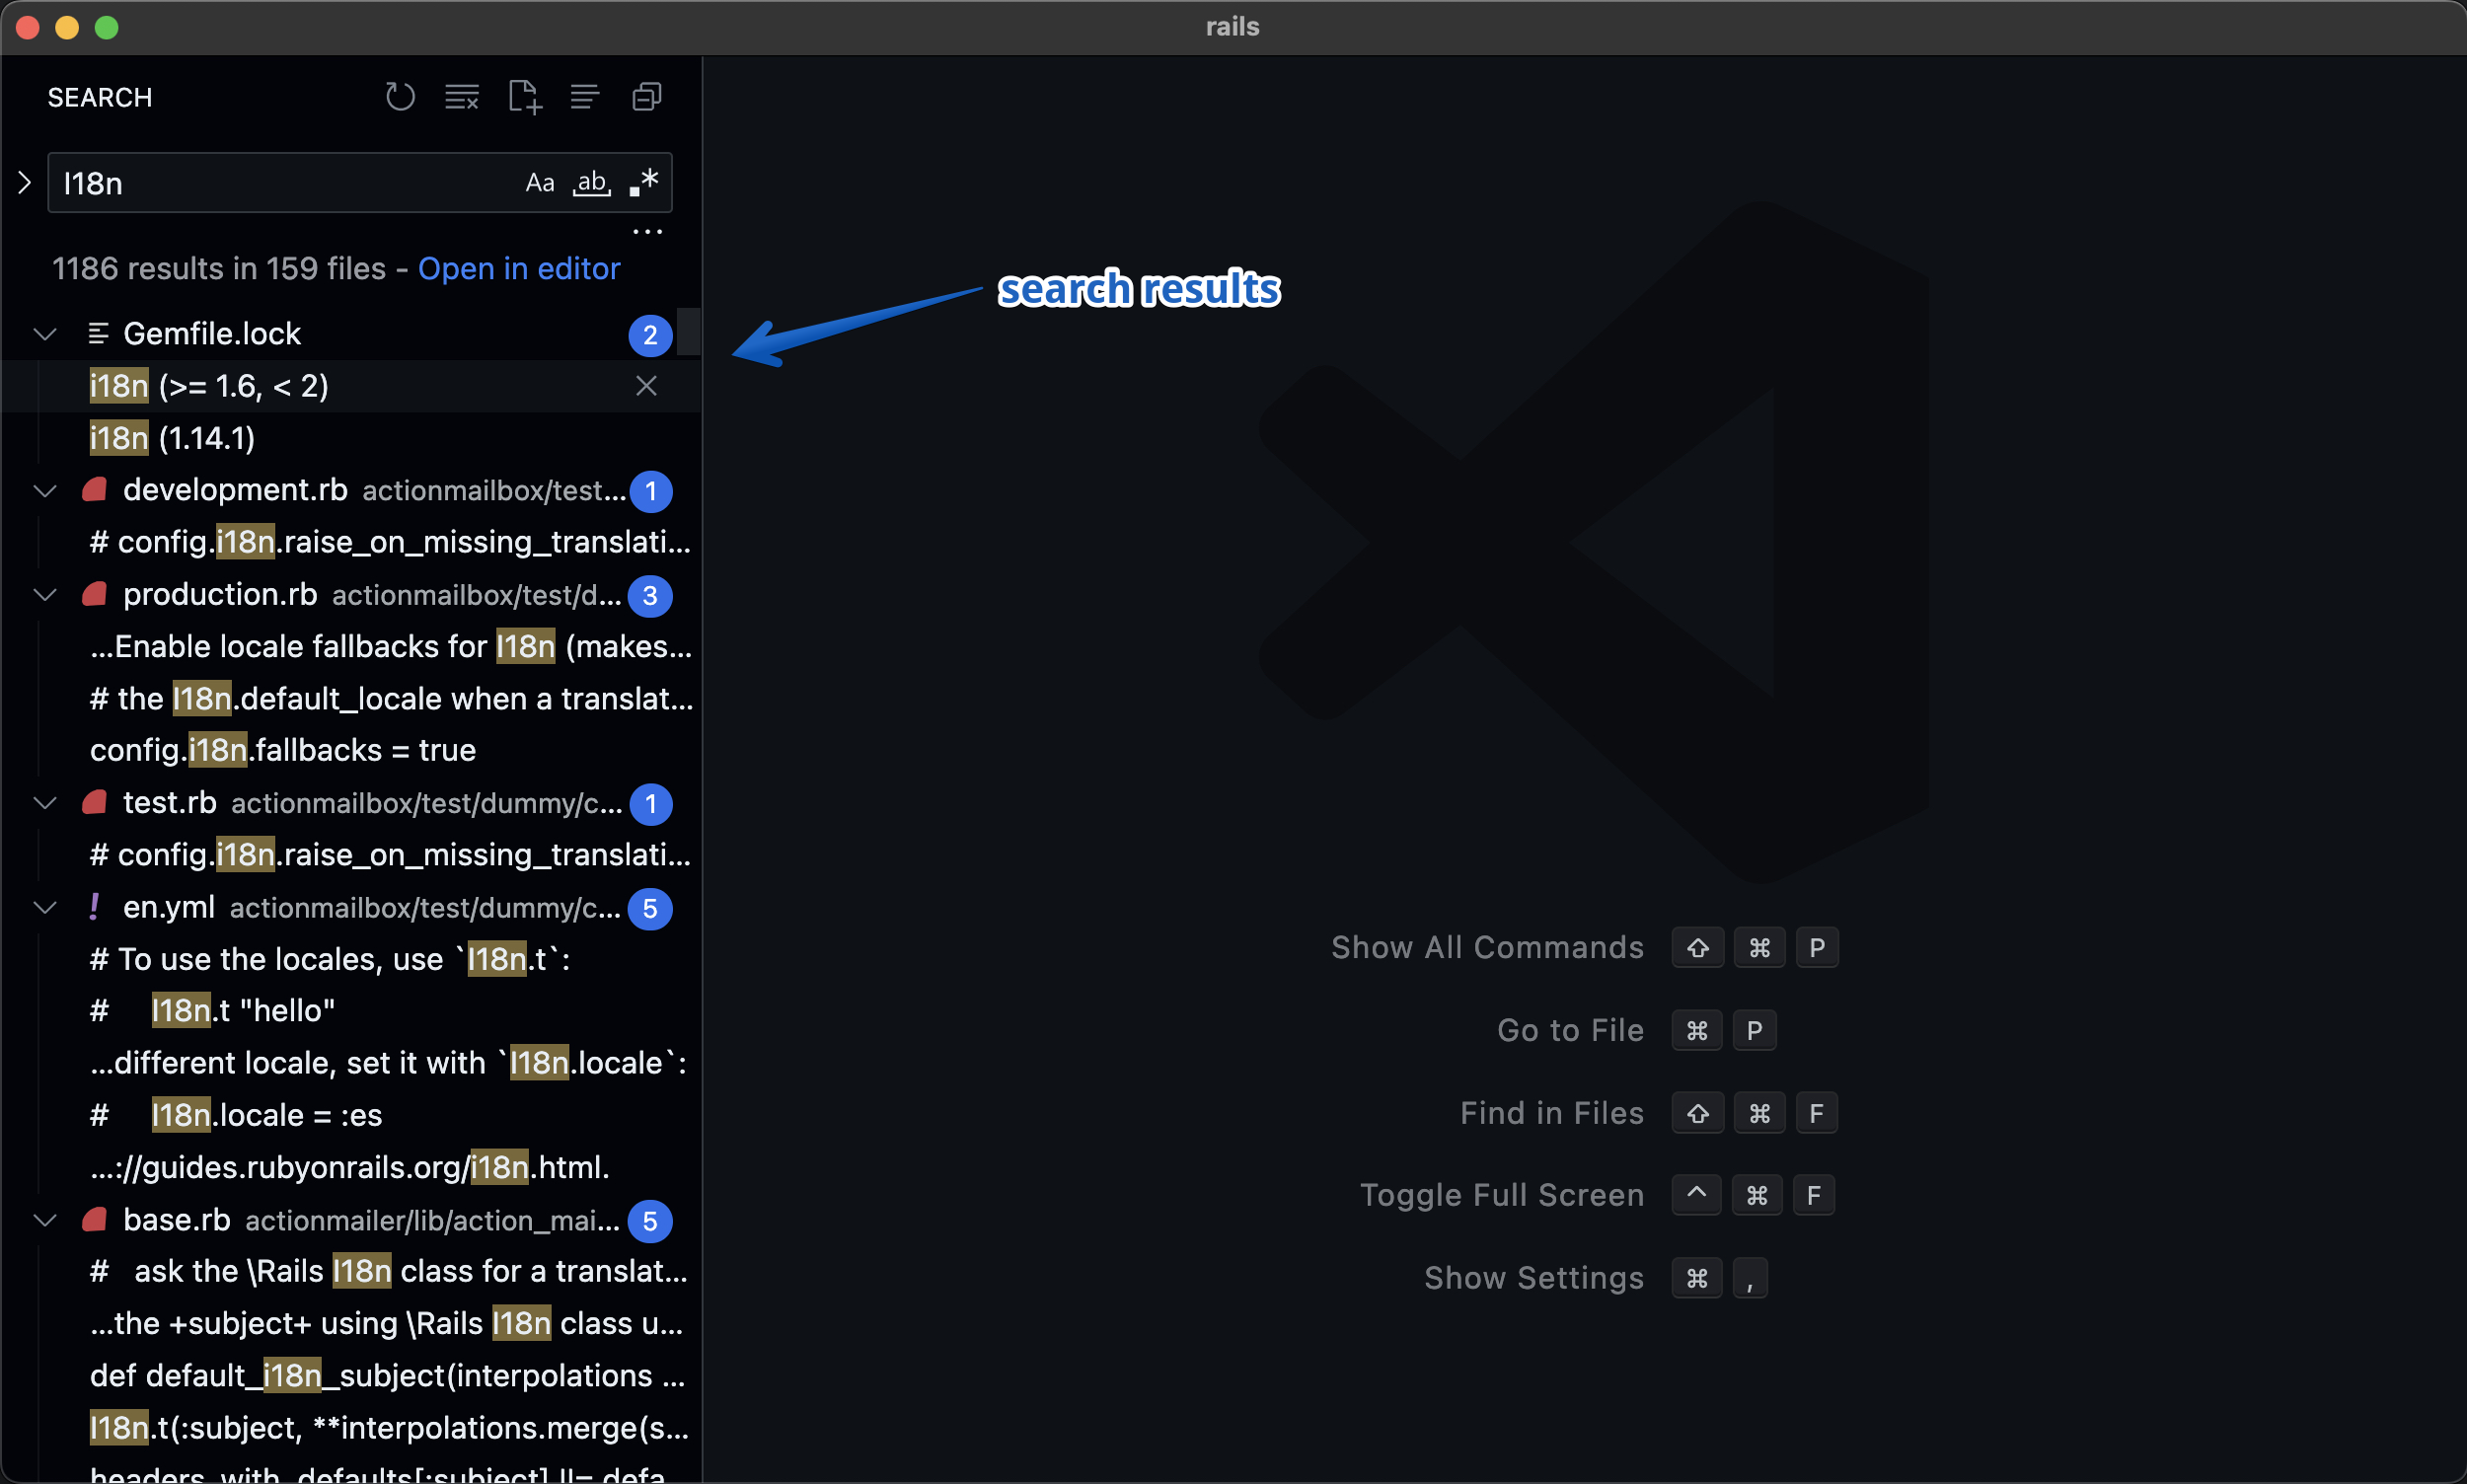
<p>Good luck 🍀</p>]]></content><author><name></name></author><category term="tech interview" /><summary type="html"><![CDATA[A senior engineer's guide to crafting an elevator pitch that connects your experience to the role — with a real example you can adapt and use right away.]]></summary></entry><entry><title type="html">VS Code Search Editor: full-editor search results with syntax highlighting</title><link href="https://lucasprag.com/posts/underrated-vscode-feature-search-editor/" rel="alternate" type="text/html" title="VS Code Search Editor: full-editor search results with syntax highlighting" /><published>2024-02-02T00:00:00+00:00</published><updated>2024-02-02T00:00:00+00:00</updated><id>https://lucasprag.com/posts/underrated-vscode-feature-search-editor</id><content type="html" xml:base="https://lucasprag.com/posts/underrated-vscode-feature-search-editor/"><![CDATA[<p>The search in the sidebar in VSCode is quite limiting in my opinion. One of the reasons is that the results show up <em>in the sidebar</em> which is small and hard to read.</p>

<p><img src="/assets/images/posts/vscode-sidebar-search.png" alt="Using the search in the sidebar to search for I18n in Rails" /></p>

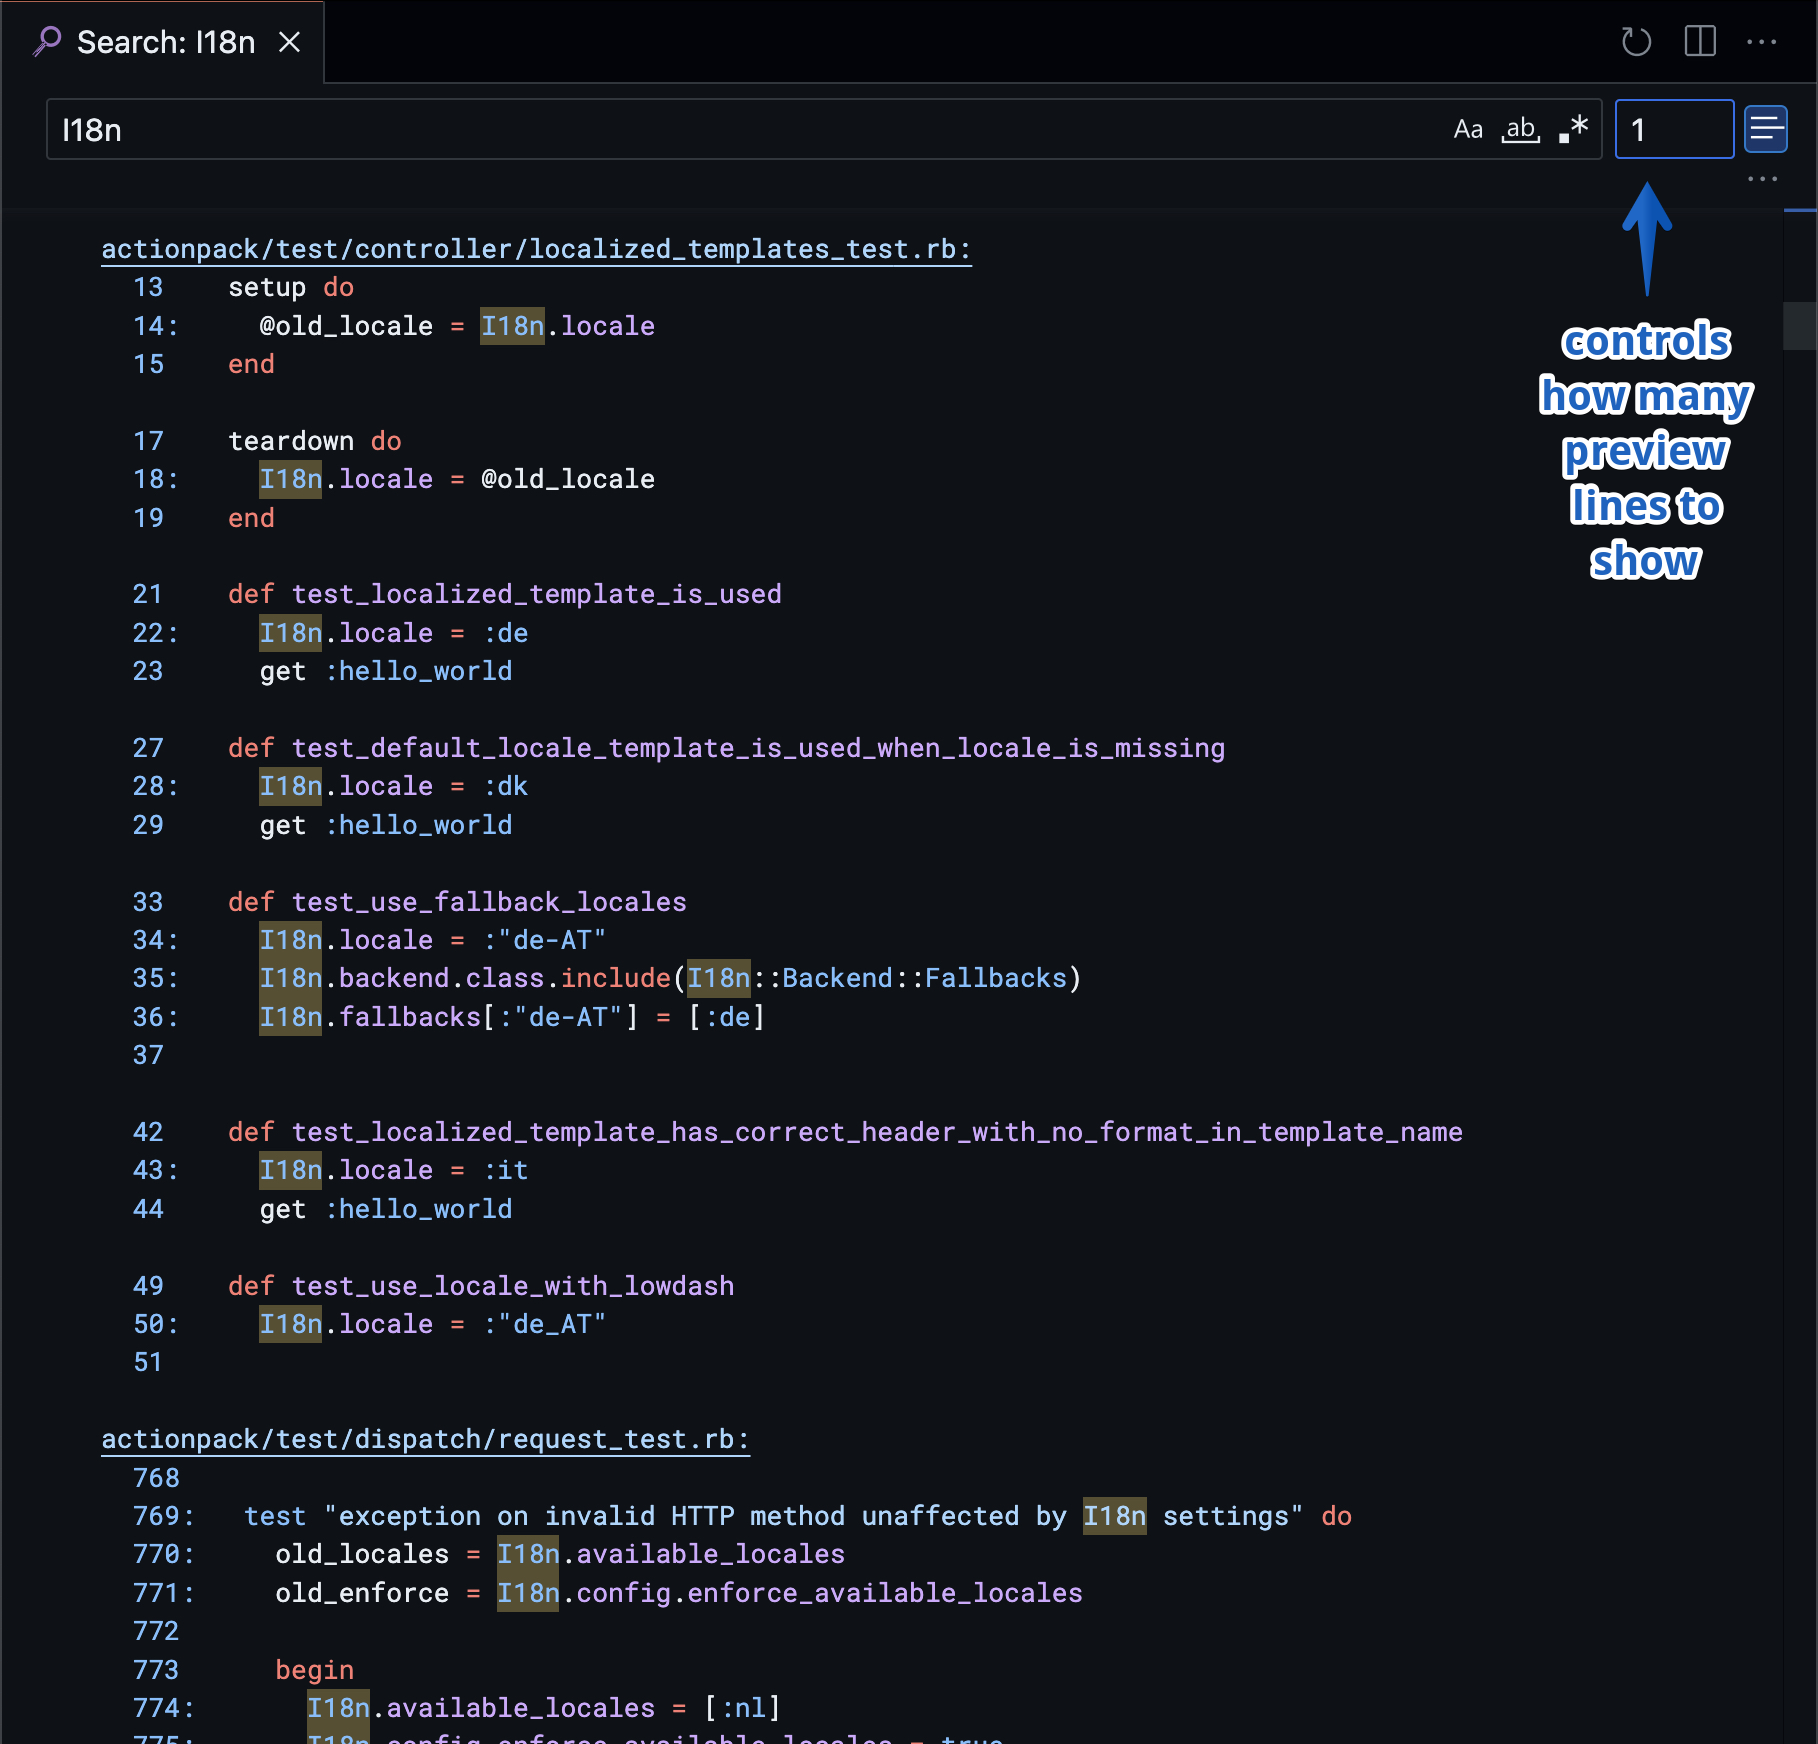
<p>With the <strong>Search Editor</strong> built-in in VSCode, the search results show up in a new editor which can use all the editor space making it much more comfortable to read and find what you’re looking for.</p>

<p>The result also features <strong>previews with syntax highlighting</strong> in addition to the features anyone would expect from a search engine like folder inclusion/exclusion, Regex support, match case, etc.</p>

<p><img src="/assets/images/posts/vscode-search-editor.png" alt="Using the search editor to search for I18n in Rails" /></p>

<p>It’s very similar to how Sublime Text does searches and it works well.</p>

<p>To open a <strong>New Search Editor</strong>, type the command <code class="language-plaintext highlighter-rouge">&gt; Search Editor: New Search Editor</code> or add a shortcut to your <code class="language-plaintext highlighter-rouge">keybindings.json</code>.</p>

<p>Mine are:</p>
<ul>
  <li><code class="language-plaintext highlighter-rouge">cmd+k s</code> to <code class="language-plaintext highlighter-rouge">search.action.openEditor</code> which opens a new editor if none is already open so you can go back to your search without using the mouse.</li>
  <li><code class="language-plaintext highlighter-rouge">cmd+k shift+s</code> to <code class="language-plaintext highlighter-rouge">search.action.openNewEditor</code> which opens a new editor regardless if there is already one open.</li>
</ul>

<div class="language-json highlighter-rouge"><div class="highlight"><pre class="highlight"><code><span class="p">[</span><span class="w">
  </span><span class="p">{</span><span class="w">
    </span><span class="nl">"key"</span><span class="p">:</span><span class="w"> </span><span class="s2">"cmd+k s"</span><span class="p">,</span><span class="w">
    </span><span class="nl">"command"</span><span class="p">:</span><span class="w"> </span><span class="s2">"search.action.openEditor"</span><span class="w">
  </span><span class="p">},</span><span class="w">
  </span><span class="p">{</span><span class="w">
    </span><span class="nl">"key"</span><span class="p">:</span><span class="w"> </span><span class="s2">"cmd+k shift+s"</span><span class="p">,</span><span class="w">
    </span><span class="nl">"command"</span><span class="p">:</span><span class="w"> </span><span class="s2">"search.action.openNewEditor"</span><span class="w">
  </span><span class="p">},</span><span class="w">
</span><span class="p">]</span><span class="w">
</span></code></pre></div></div>

<p>Done. Enjoy doing searches in VSCode.</p>]]></content><author><name></name></author><category term="vscode" /><category term="productivity" /><summary type="html"><![CDATA[VS Code's built-in Search Editor shows results in a full editor tab instead of the cramped sidebar — with syntax highlighting, previews, regex, and folder filters.]]></summary><media:thumbnail xmlns:media="http://search.yahoo.com/mrss/" url="https://lucasprag.com/vscode-search-editor.png" /><media:content medium="image" url="https://lucasprag.com/vscode-search-editor.png" xmlns:media="http://search.yahoo.com/mrss/" /></entry><entry><title type="html">VS Code Native Tabs: manage multiple projects without juggling windows</title><link href="https://lucasprag.com/posts/underrated-vscode-feature-native-tabs/" rel="alternate" type="text/html" title="VS Code Native Tabs: manage multiple projects without juggling windows" /><published>2024-02-01T00:00:00+00:00</published><updated>2024-02-01T00:00:00+00:00</updated><id>https://lucasprag.com/posts/underrated-vscode-feature-native-tabs</id><content type="html" xml:base="https://lucasprag.com/posts/underrated-vscode-feature-native-tabs/"><![CDATA[<p>Four VS Code windows. Three Cmd+Tab clicks to get to the right one. Sound familiar?</p>

<p><strong>Native Tabs</strong> groups all your VS Code windows into a single tabbed interface — one window, all your projects, a keyboard shortcut to move between them.</p>

<blockquote>
  <p><strong>macOS only.</strong> Native Tabs is a macOS feature and won’t appear on Windows or Linux.</p>
</blockquote>

<p>Notice how each project is in a different tab:</p>

<p><img src="/assets/images/posts/vscode-native-tabs.png" alt="Native Tabs on VSCode" /></p>

<h2 id="how-to-set-up-native-tabs">How to set up Native Tabs</h2>

<p>Add this to your <code class="language-plaintext highlighter-rouge">settings.json</code>:</p>

<div class="language-json highlighter-rouge"><div class="highlight"><pre class="highlight"><code><span class="nl">"window.nativeTabs"</span><span class="p">:</span><span class="w"> </span><span class="kc">true</span><span class="w">
</span></code></pre></div></div>

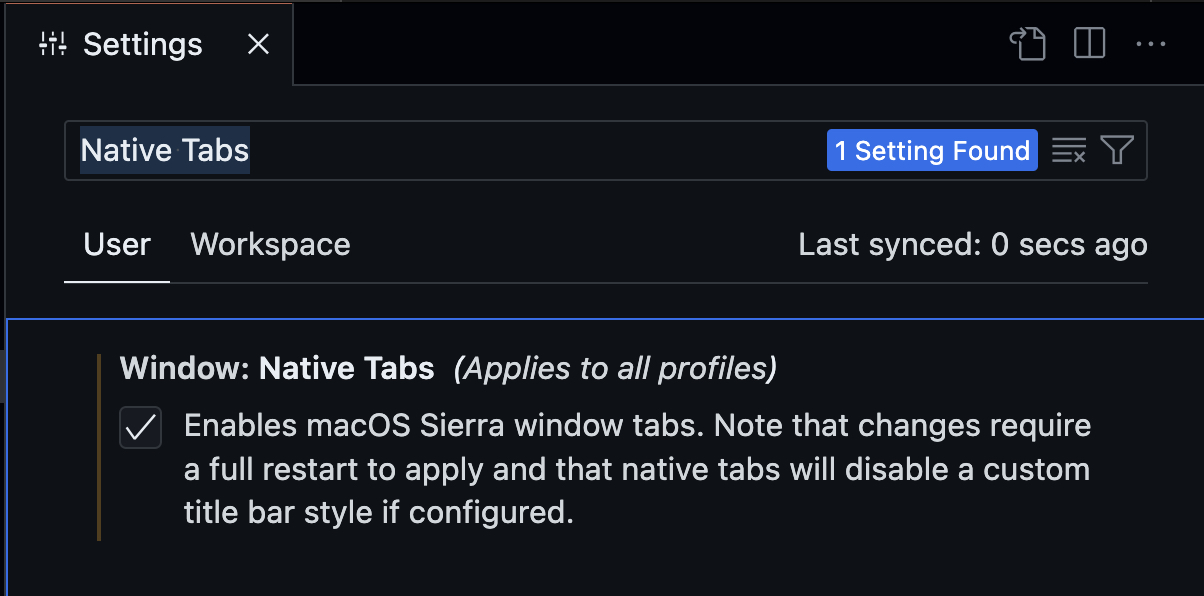
<p>Or search for “Native Tabs” in Settings and toggle it on.</p>

<p><img src="/assets/images/posts/vscode-native-tabs-setting.png" alt="Native Tabs Settings on VSCode" /></p>

<p>Restart VS Code.</p>

<h2 id="how-to-move-between-native-tabs">How to move between Native Tabs</h2>

<p>Add these to your <code class="language-plaintext highlighter-rouge">keybindings.json</code> to move between tabs and create new ones without touching the mouse:</p>

<div class="language-json highlighter-rouge"><div class="highlight"><pre class="highlight"><code><span class="p">[</span><span class="w">
  </span><span class="p">{</span><span class="w">
    </span><span class="nl">"key"</span><span class="p">:</span><span class="w"> </span><span class="s2">"ctrl+shift+h"</span><span class="p">,</span><span class="w">
    </span><span class="nl">"command"</span><span class="p">:</span><span class="w"> </span><span class="s2">"workbench.action.showPreviousWindowTab"</span><span class="p">,</span><span class="w">
    </span><span class="nl">"when"</span><span class="p">:</span><span class="w"> </span><span class="s2">"!terminalFocus"</span><span class="w">
  </span><span class="p">},</span><span class="w">
  </span><span class="p">{</span><span class="w">
    </span><span class="nl">"key"</span><span class="p">:</span><span class="w"> </span><span class="s2">"ctrl+shift+l"</span><span class="p">,</span><span class="w">
    </span><span class="nl">"command"</span><span class="p">:</span><span class="w"> </span><span class="s2">"workbench.action.showNextWindowTab"</span><span class="p">,</span><span class="w">
    </span><span class="nl">"when"</span><span class="p">:</span><span class="w"> </span><span class="s2">"!terminalFocus"</span><span class="w">
  </span><span class="p">},</span><span class="w">
  </span><span class="p">{</span><span class="w">
    </span><span class="nl">"key"</span><span class="p">:</span><span class="w"> </span><span class="s2">"ctrl+shift+t"</span><span class="p">,</span><span class="w">
    </span><span class="nl">"command"</span><span class="p">:</span><span class="w"> </span><span class="s2">"workbench.action.newWindowTab"</span><span class="w">
  </span><span class="p">}</span><span class="w">
</span><span class="p">]</span><span class="w">
</span></code></pre></div></div>

<p>These are my bindings — use whatever feels natural to you.</p>

<p>That’s the full setup. Here’s what I pair it with:</p>

<div class="not-prose mt-8 p-5 bg-white dark:bg-gray-900 rounded-xl border border-gray-200 dark:border-gray-700">
  <p class="font-semibold text-gray-900 dark:text-white mb-1">Extensions that pair well with this workflow</p>
  <p class="text-sm text-gray-500 dark:text-gray-400 mb-4">Native Tabs organizes your windows — these two handle what happens inside them:</p>
  <div class="flex flex-col gap-3">
    <div class="flex items-start gap-3">
      <img src="https://lucasprag.com/assets/images/extensions/folder-projects/logo.png" alt="Folder Projects" class="w-8 h-8 rounded-md mt-0.5 shrink-0" />
      <div>
        <a href="/extensions/folder-projects" class="font-semibold text-blue-600 dark:text-blue-400 hover:underline">Folder Projects</a>
        <p class="text-sm text-gray-600 dark:text-gray-400 mt-0.5">Point it at your code directories, switch to any project instantly from the command palette. No Finder, no terminal.</p>
      </div>
    </div>
    <div class="flex items-start gap-3">
      <img src="https://lucasprag.com/assets/images/extensions/dont-git-lost/logo.png" alt="Don't Git Lost" class="w-8 h-8 rounded-md mt-0.5 shrink-0" />
      <div>
        <a href="/extensions/dont-git-lost" class="font-semibold text-blue-600 dark:text-blue-400 hover:underline">Don't Git Lost</a>
        <p class="text-sm text-gray-600 dark:text-gray-400 mt-0.5">Adds inline blame and file history to the editor toolbar. Hover any line to see who wrote it, the commit message, and a link to the PR.</p>
      </div>
    </div>
  </div>
</div>

<hr />

<p>Note: Unfortunately, Native Tabs is only available on macOS. <code class="language-plaintext highlighter-rouge">=/</code></p>]]></content><author><name></name></author><category term="vscode" /><category term="productivity" /><summary type="html"><![CDATA[VS Code Native Tabs let you group all your project windows into one tabbed interface — no more Cmd+Tab hunting. Here's how to set it up in 2 minutes.]]></summary><media:thumbnail xmlns:media="http://search.yahoo.com/mrss/" url="https://lucasprag.com/vscode-native-tabs.png" /><media:content medium="image" url="https://lucasprag.com/vscode-native-tabs.png" xmlns:media="http://search.yahoo.com/mrss/" /></entry><entry><title type="html">The secret behind my productivity using the command line</title><link href="https://lucasprag.com/posts/the-secret-behind-my-productivity-using-the-command-line/" rel="alternate" type="text/html" title="The secret behind my productivity using the command line" /><published>2022-08-10T00:00:00+00:00</published><updated>2022-08-10T00:00:00+00:00</updated><id>https://lucasprag.com/posts/the-secret-behind-my-productivity-using-the-command-line</id><content type="html" xml:base="https://lucasprag.com/posts/the-secret-behind-my-productivity-using-the-command-line/"><![CDATA[<p>As a developer, I use the command line every day. I believe that getting better at it over the years drastically increased my productivity. Here are some things I’ve picked up that go along the way to help me get work done and that might help you as well.</p>

<h2 id="combine-commands-with-pipe-">Combine commands with pipe <code class="language-plaintext highlighter-rouge">|</code></h2>

<p>Here are some commands from my own history:</p>

<h4 id="pbcopy">pbcopy</h4>

<p>I can copy the results of commands using <code class="language-plaintext highlighter-rouge">pbcopy</code> on Mac, but there is a similar command on other systems.</p>

<p>No need to switch to the mouse to copy any output from a command.</p>

<p>Examples:</p>
<ul>
  <li><code class="language-plaintext highlighter-rouge">git diff | pbcopy</code> to share a quick idea with a colleague at work</li>
  <li><code class="language-plaintext highlighter-rouge">cat ~/.ssh/id_rsa.pub | pbcopy</code> to copy a key and add it to Github</li>
  <li><code class="language-plaintext highlighter-rouge">ruby weekly_report.rb -p7d | pbcopy</code> to run a script, generate a weekly report and copy the output</li>
</ul>

<p>I can also use <code class="language-plaintext highlighter-rouge">pbpaste</code>, but I don’t find that as useful as <code class="language-plaintext highlighter-rouge">pbcopy</code> because I’m usually pasting the content on Slack, Jira, Github, etc, not the other way around.</p>

<h4 id="grep">grep</h4>

<p><code class="language-plaintext highlighter-rouge">grep</code> is useful for filtering the output of the previous command and searching the content of files</p>

<p>Examples:</p>
<ul>
  <li><code class="language-plaintext highlighter-rouge">gem list | grep rubocop</code> to see the version of the rubocop gem I have installed on my machine</li>
  <li><code class="language-plaintext highlighter-rouge">cat Gemfile.lock | grep rubocop</code> to see the version of the rubocop gem I have installed on a Rails project</li>
</ul>

<h4 id="xargs">xargs</h4>

<p><code class="language-plaintext highlighter-rouge">xargs</code> executes a command for each line of the previous output.</p>

<p>For example, sometimes I have too many branches locally on my git repository so I delete them in steps to make sure I don’t delete a branch I’m currently working on.</p>

<div class="language-text highlighter-rouge"><div class="highlight"><pre class="highlight"><code>$ git branch | grep fix | xargs git branch -D
</code></pre></div></div>

<p><code class="language-plaintext highlighter-rouge">git branch</code> lists all branches, <code class="language-plaintext highlighter-rouge">grep fix</code> filters them using the term “fix”, finally, <code class="language-plaintext highlighter-rouge">xargs</code> deletes all these branches in one go.</p>

<h4 id="awk">awk</h4>

<p>I find <code class="language-plaintext highlighter-rouge">awk</code> helpful for extracting data from more complex outputs. This means I can extract only one column of the previous output to continue working with my pipes.</p>

<p>For example, when I need to delete files in my git repository, I simply do this:</p>

<div class="language-text highlighter-rouge"><div class="highlight"><pre class="highlight"><code>git status -s | grep '??' | awk '{ print $2 }' | xargs rm -rf
</code></pre></div></div>

<p>There might be a nice git command to do the same, but I don’t need that because at some point I wrote the command above so it made to my history and now it’s a quick <code class="language-plaintext highlighter-rouge">ctrl+r</code> away which brings me to the next topic.</p>

<h2 id="history-search">History search</h2>

<p>All the commands I type on my terminal are saved into a history file. Then I search on said file using <code class="language-plaintext highlighter-rouge">ctrl+r</code> and it brings up the commands I used before to my current terminal.</p>

<p>This means that the command above is just a few keystrokes away. Try it yourself!</p>

<p>Note: <code class="language-plaintext highlighter-rouge">ctrl+r</code> is available by default on shells like <code class="language-plaintext highlighter-rouge">bash</code> or <code class="language-plaintext highlighter-rouge">zsh</code>, but it needs to be added when using <code class="language-plaintext highlighter-rouge">fish</code>.</p>

<h2 id="gpu-accelerated-terminal-emulator">GPU-accelerated terminal emulator</h2>

<p>After I started using a GPU-accelerated terminal, I couldn’t look back to <a href="https://iterm2.com/index.html">iTerm</a> and others.</p>

<p>As a developer, the terminal is my second most used tool – the code editor being the first – and I need it to be really fast. Not just fast, <em>really</em> fast.</p>

<p>I currently use <a href="https://github.com/alacritty/alacritty">Alacritty</a> and it gets the job done, but there are a few features I miss from it like splits, tabs, search, etc. For all of that, I need to use <a href="https://github.com/tmux/tmux">tmux</a> which I was already using before so I’m ok with it for now.</p>

<p>However, another option that caught my eye as a GPU-accelerated terminal and that implements all these features I mentioned – and much more! – is <a href="https://sw.kovidgoyal.net/kitty/">Kitty</a> 🤩</p>

<p>I’m considering moving away from Alacritty+tmux and going all in into Kitty because it could be a <em>much easier</em> way to allow me to:</p>

<ul>
  <li>organize and name all my terminals</li>
  <li>predefine them on list and open them all in one go</li>
  <li>move around within tabs, splits, etc using shortcuts – this is gold 🏆</li>
</ul>

<p>Sometimes the apps at work can use multiple terminals and even more when I have to work on multiple apps at the same time (e.g. API + front-end + admin + backoffice app + ???). In addition to that, they also output a lot of content and a GPU-accelerated terminal emulator comes in handy for that.</p>

<h2 id="bonus-1-turn-off-all-animations">Bonus #1: Turn off all animations</h2>

<p>I turn off all animations I can or simply avoid Mac features that have them. I know they look great, but the way I see them, they just take time out of me. They are also not fun for my computer to render, <strong>especially</strong> when I’m sharing my screen over the internet with my colleagues. 😕</p>

<h2 id="bonus-2-automate-moving-windows-around">Bonus #2: Automate moving windows around</h2>

<p>This is not terminal-related, but one tool that heavily improves my productivity is <a href="https://www.hammerspoon.org/">Hammerspoon</a>.</p>

<p>The app itself is a bridge between the operating system and a Lua scripting engine, which can be used to manage, move, and resize windows around.</p>

<p>This is my script (<a href="https://github.com/lucasprag/dotfiles/blob/main/hammerspoon/init.lua">link</a>) as an example. I have shortcuts to move windows to predefined spots on my screen, in addition, to resizing them to occupy 50%, 75% or 100% of the space. Multi-monitor support is also available. ✨</p>

<h2 id="wrapping-up">Wrapping up</h2>

<p>These are some things I’ve picked up during my life as a developer that helped me do my work. If you have any more tips, let me know on twitter! I hope that you have found something new to help <strong>you</strong> boost your productivity as well. 🚀</p>]]></content><author><name></name></author><category term="terminal" /><category term="productivity" /><summary type="html"><![CDATA[As a developer, I use the command line every day. I believe that getting better at it over the years drastically increased my productivity. Here are some things I've picked up that go along the way to help me get work done and that might help you as well.]]></summary></entry></feed>